How to Setup the *Arr Stack on Olares One
Prowler:
Set Prowlarr authentication to Internal under settings / application / Entrances / Access Policies / Authentication level = internal
Hey guys, in this video we are going to cover how to set up your very own media management server so you can get away from those costly subscriptions that keep you paying for the rest of your life. Home labbing is about decentralizing the internet and not depending on the big guys, so this is a great step in the right direction in creating information freedom.
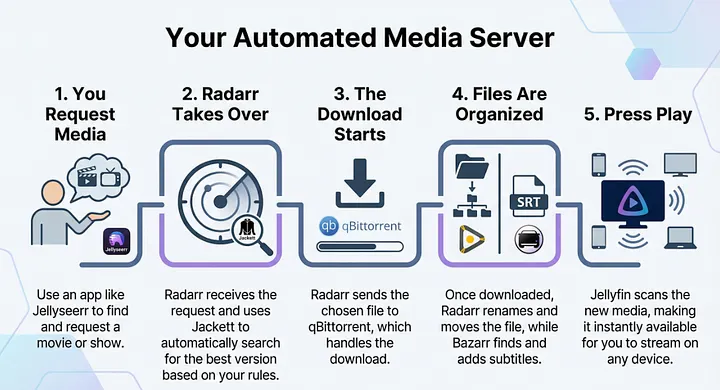
What We Need
Before we get started, there are quite a few applications you will need to make this work, so I want to take a minute to explain what each one does. We have three parts (in reality more depending on what kind of content you want to have, movies, books, tv shows, etc), but those are a Media manager, a database indexer to find that media, and then a downloader or a torrent.
What Each Application in the ARR Stack Does
- Prowlarr acts as a centralized indexer manager, handling torrent trackers and Usenet indexers with sync profiles that push configurations to the other *arr apps.
- Radarr automates movie library management (searching, downloading, organizing).
- Lidarr does the same for music.
- qBittorrent is the actual torrent client that handles downloads for each independent app
Our Software Stack
So now that you have an idea on what each piece does, here is the software stack we are going to setup for this video:
- Prowlarr: This automatically index RSS feeds for all our apps so we can find the content we want without having to add an indexer to every single app.
- Radarr: We will use this to manage our movies
- qBittorrent will be the application that downloads the content.
- FlareSolverr (Used to get around potential bot blocking when indexing data).
- JellyFin enables you to collect, manage, and stream your media. Think of JellyFin as your way to browse your media and select what you want to watch, like browsing Netflix for a new move to watch.
An RSS feed (Really Simple Syndication) is a standardized, XML-based text file that allows users and applications to access updated website content—such as blog posts, news headlines, or podcasts—in a machine-readable format.
Download The Following
From the Olares App Store (called Market) you need to download the following apps:
- Prowlarr (Our indexer and RSS feed Manager)
- Radarr (Our Movie Collection Manager)
- qBittorrent (Where we grab the movie files from, or any other content type)
- FlareSolverr (helps Avoid Bot Blocking on Websites)
- JellyFin (a GUI to select and browse your media)
Optional:
- Readarr (An eBook and Audio Book Manager)
- Lidarr (A music Collection Manager)
Grabbing API URLs
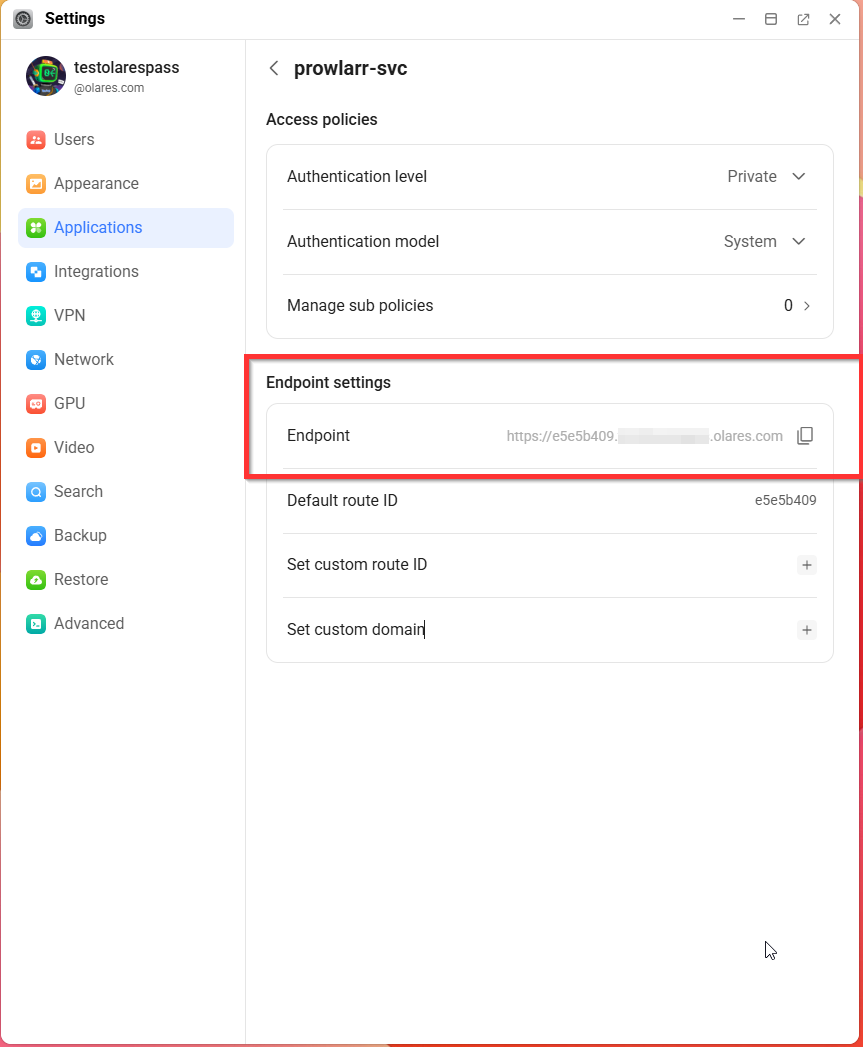
After everything is downloaded, we are going to have to either grab an API or an API URL. I will show you how to do it with one app, but it is the same for all other apps too!
Open the Settings / Applications / (The app you are currently working on setting up) / Entrances / (There will be a header that states “Endpoint Settings” and then a row that says “Endpoitnt,” you will grap the endpoint URL from there:
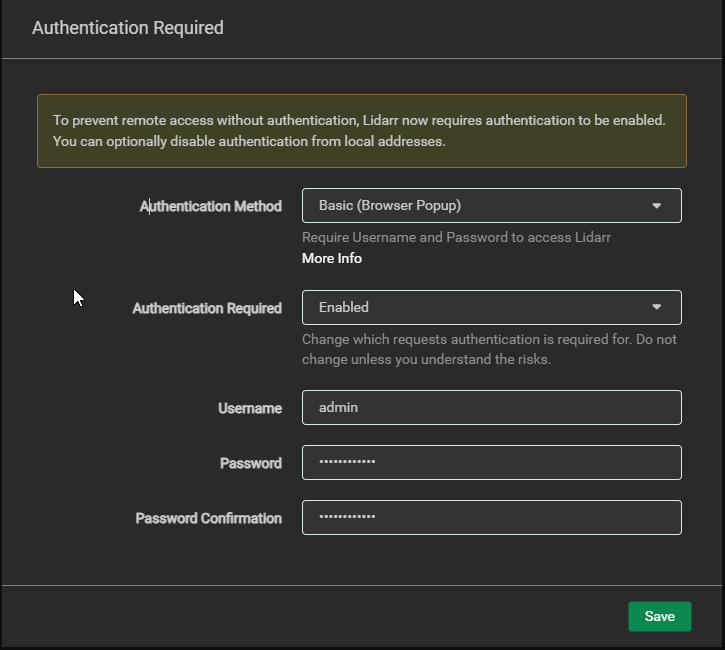
Creating an Account
This process will virtually be the same for all of your apps too, as I go through this tutorial and open an app to connect, you may need to first sign up, pause the video and do that as needed.
Creating Media Folders
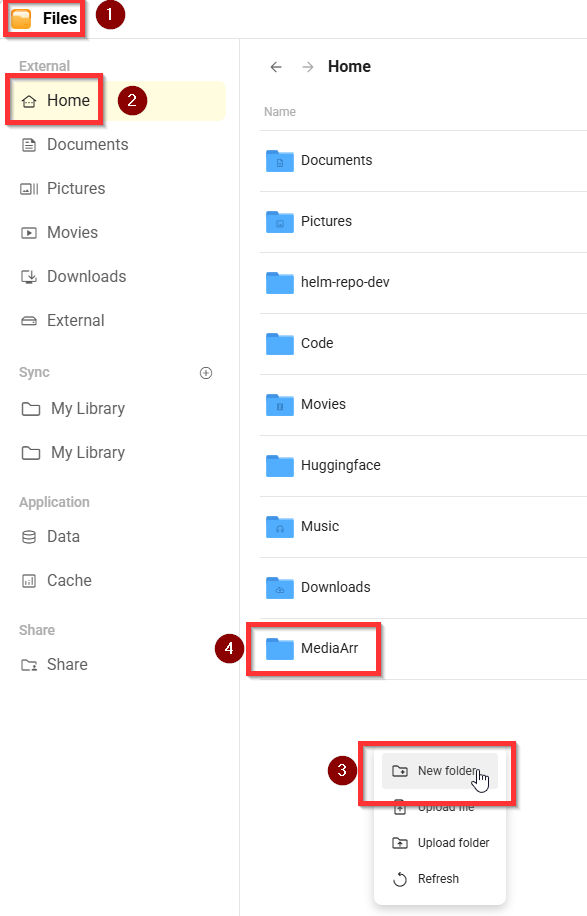
The next thing we need to do is create ONE media folder within the Olares file system, that can be done by navigating to the File Explorer Application:
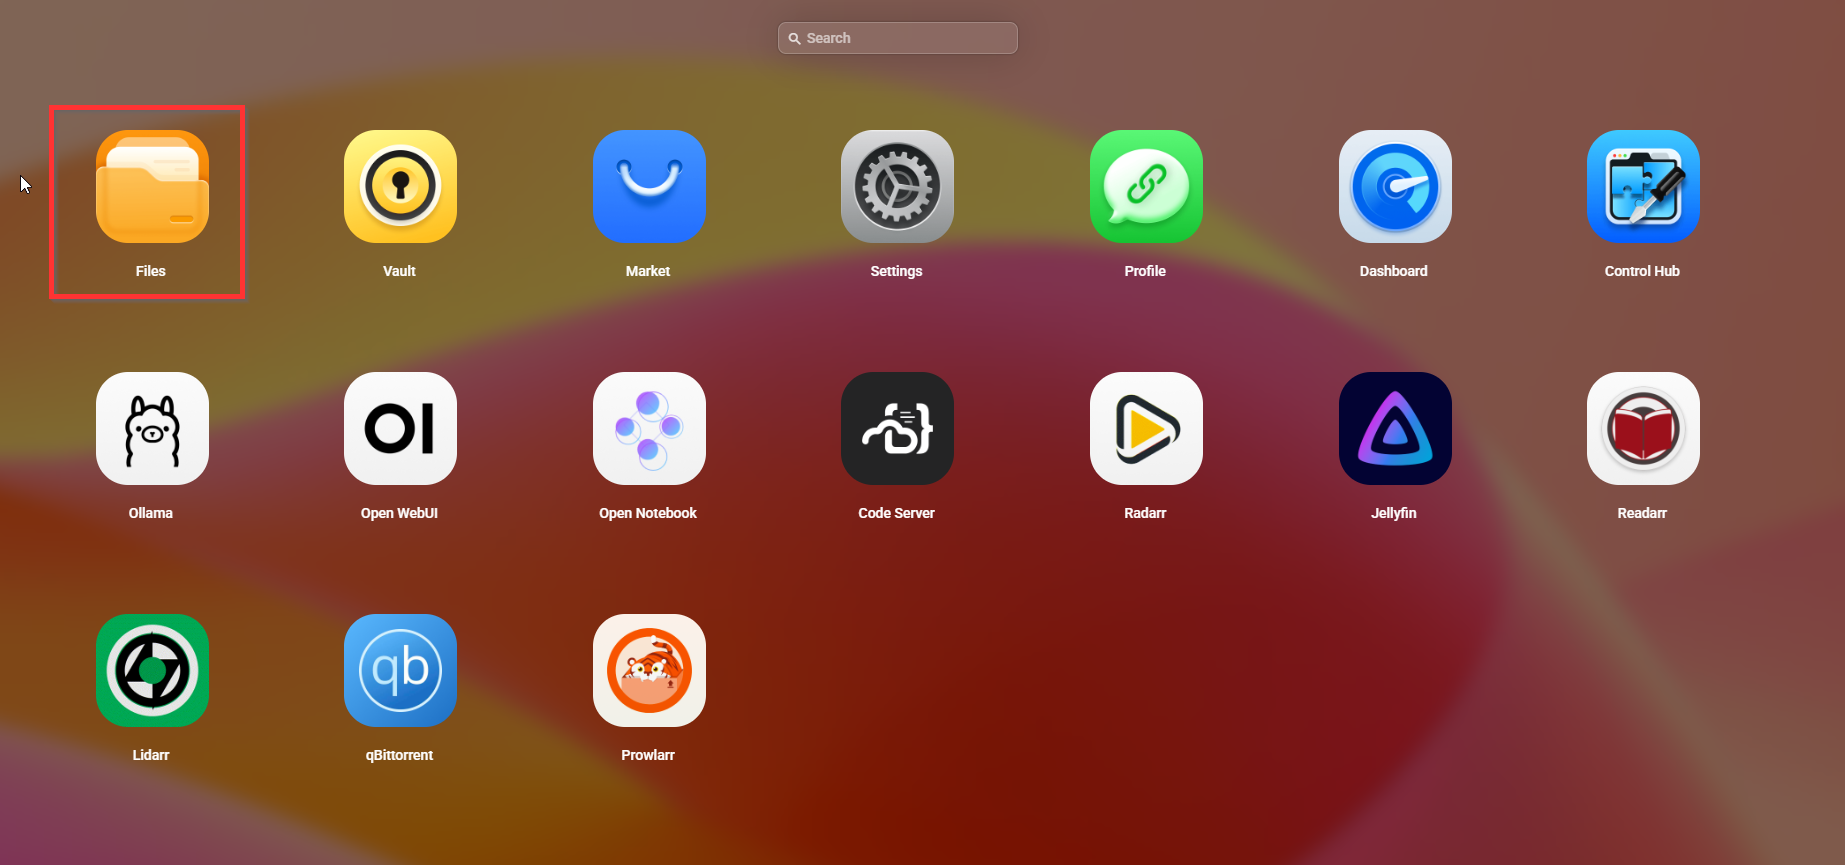
Right-click within an empty space within your home folder and make one folder. In our use case, we are going to call it MediaARR so it is easy to know that the content is for our *arr stack.
Set a File Storage Directory
The next thing we need to do is create a directory for all our files to be stored so it is easy to access and remember.
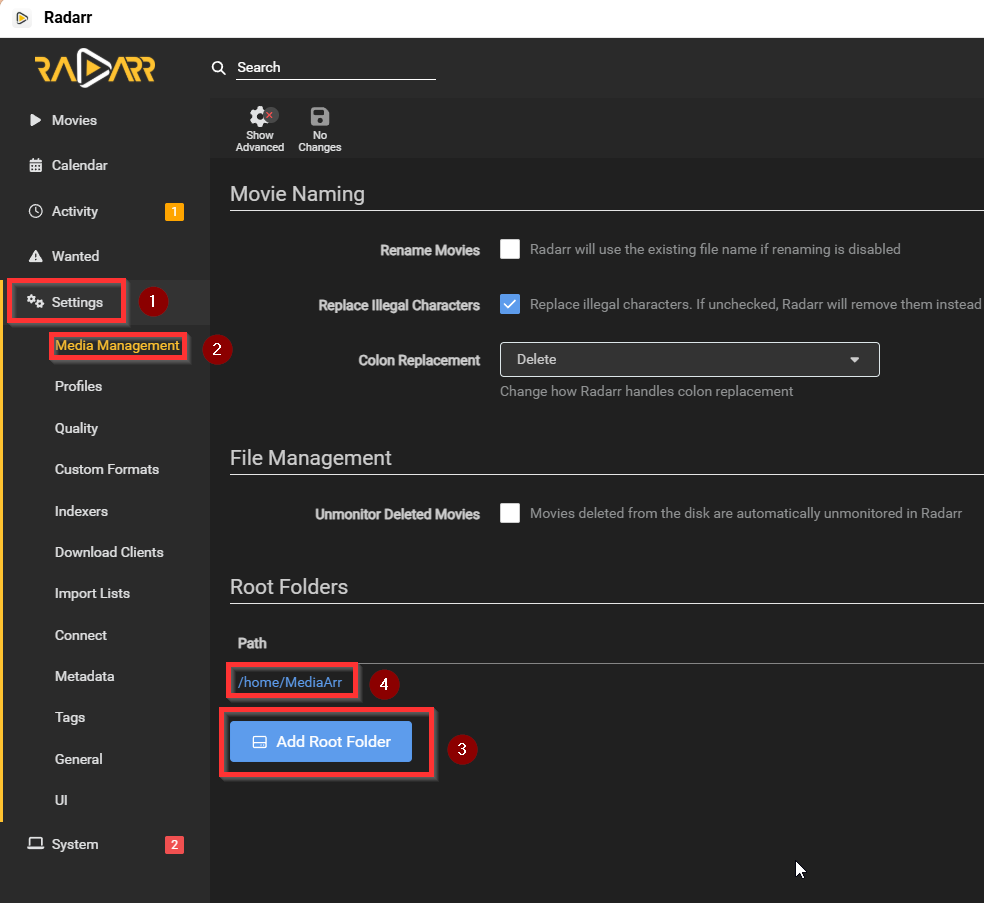
To add your Media Storage location, open any *arr app, go to Settings / Media Management / (and then add the location we just created above for the root folder path.
Set qBittorrent Download Path
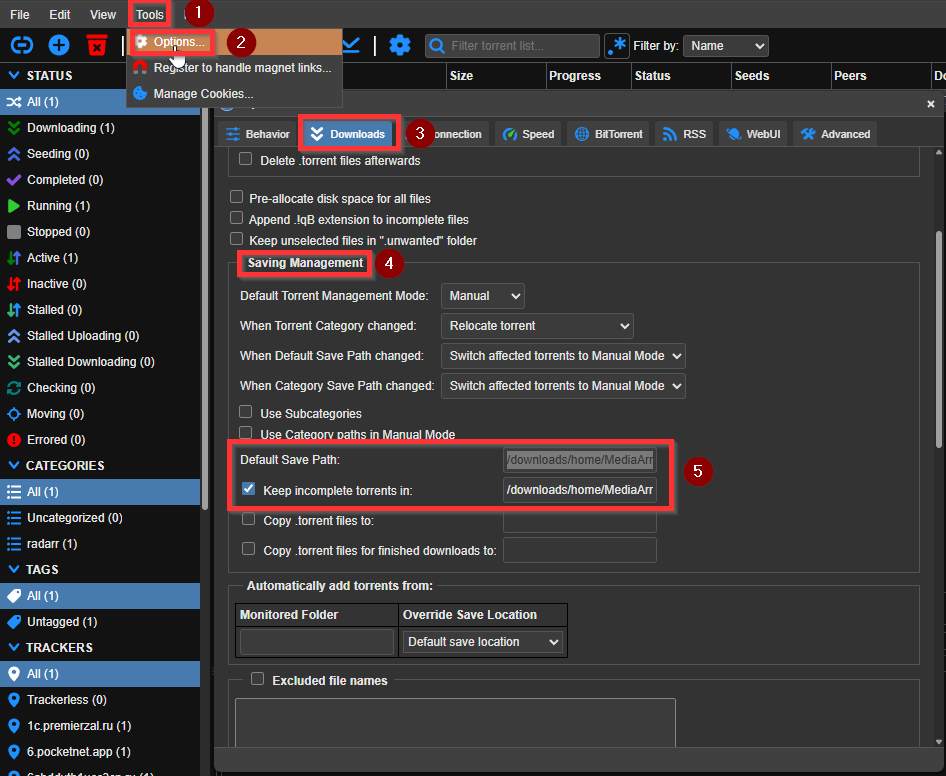
The next thing we need to do is open the qBittorrent app and set the same download location for our files. If we do not do this, then we will be unable to see our media within our apps.
Open qBittorrent / Tools / options / Downloads. Scroll down to saving Management and you will see Default Save Path: set the location to the same folder location as you set in the file explorer.
The default path if following this tutorial will be /downloads/home/MediaArr
FlareSolverr
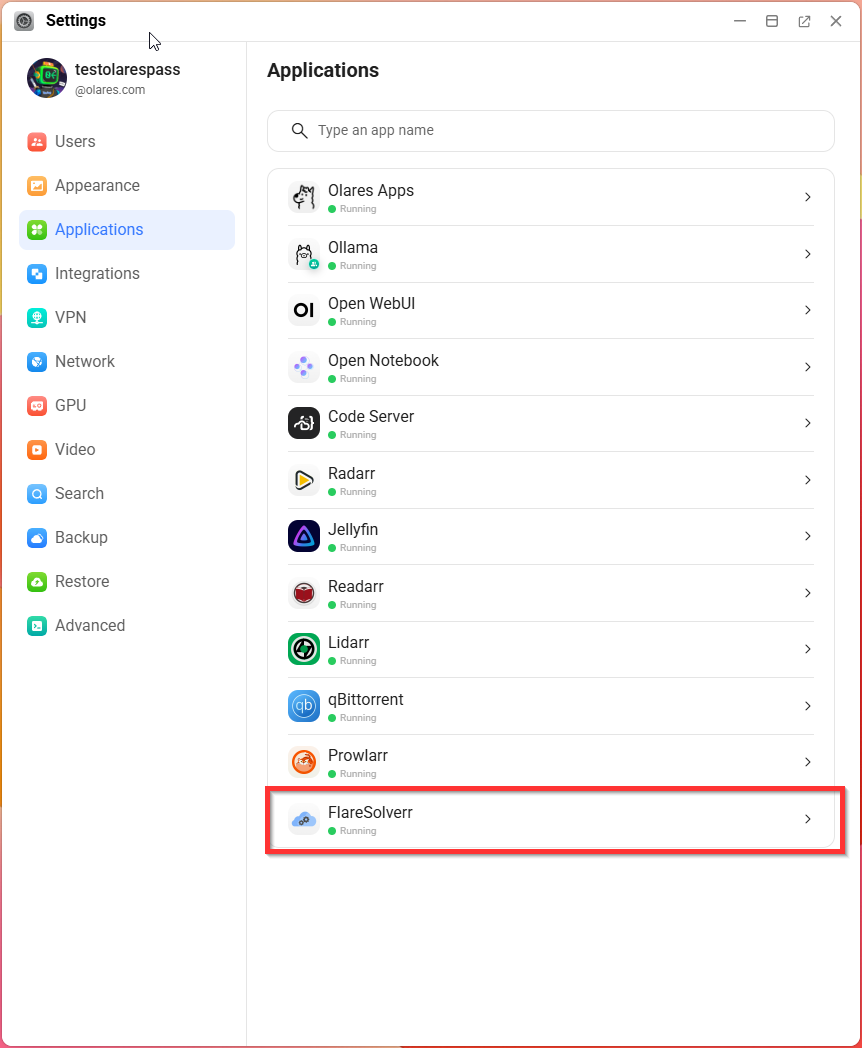
When you download FlareSolverr it will not be within your applications on your desktop like all other apps but found under Settings / Applications
Add FlareSolverr to Prowlarr
FlareSolverr API key will be added to Prowlarr under Settings / Indexers / Indexer Proxies.
Please use the following settings (but keep in mind to use the URL that is found within your FlareSolverr API URL in the settings like shown in the above image.
Pay close attention here too, we are switching it to a .local domain AND making it HTTP not HTTP(S)
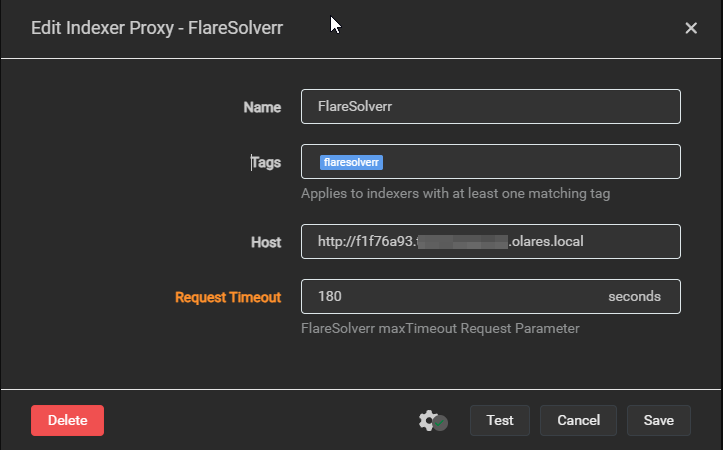
Prowlarr Index Settings
After you download Prowlarr, and login with an account as shown previously, add the 1337x index:
There is only two settings you will need to change: Base URL to https://1337x.to/
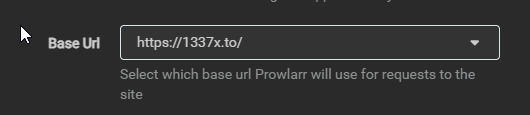
And Tags:
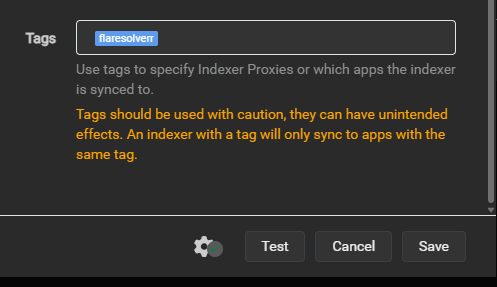
Prowlarr Add Application
This step adds the Prowlarr Indexer to your applications automatically, that is why you need your application (like Radarr’s) API key. Meaning you do not need to add an indexer to each app after this, it is done during this step when adding it to Prowlarr.
The next thing we need to do is add Applications, this will allow our apps to see videos, movies, etc. Content as they get added to the indexes for us to download.
Inside of Prowlarr go to Settings / Apps / and click the + under Applications.
We are going to use Radarr for the purpose of this tutorial, but again it will be the same for all other *arr apps!
- Name the app
- Add the Prowlarr URL (NOTE: For this use case, Olares wants us to use HTTP:// and .com instead so ensure you are not using HTTP(s) or .local for this step)
- Add your Radarr URL
- Grab the API key. It will be found within your Radarr App under Settings / general / Security
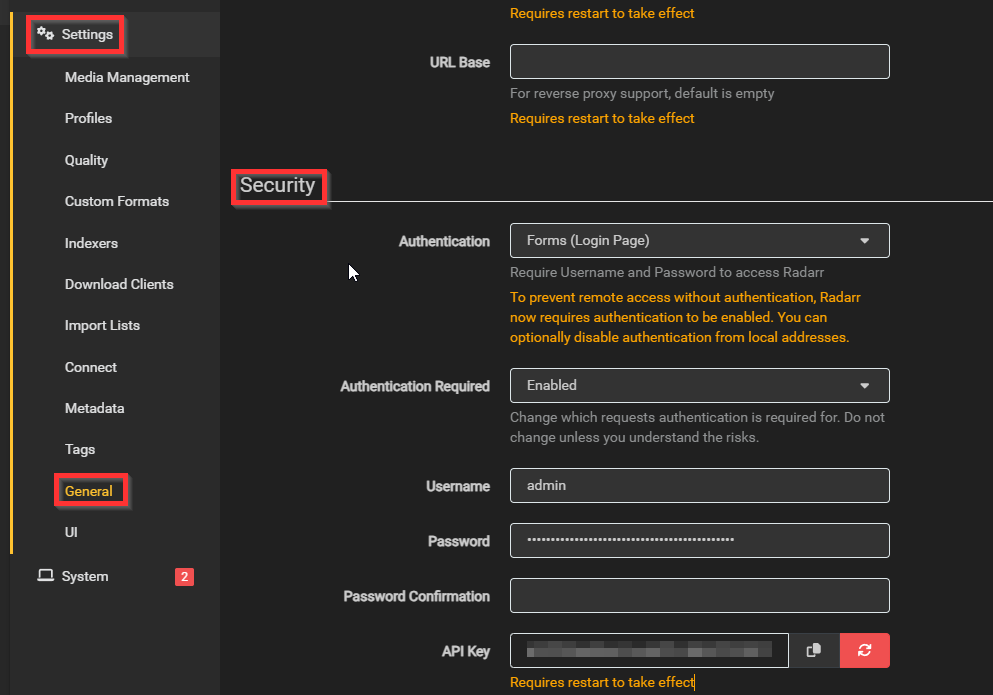
Then the below image is all that info we just grabbed going inside of Prowlarr Settings / Applications:
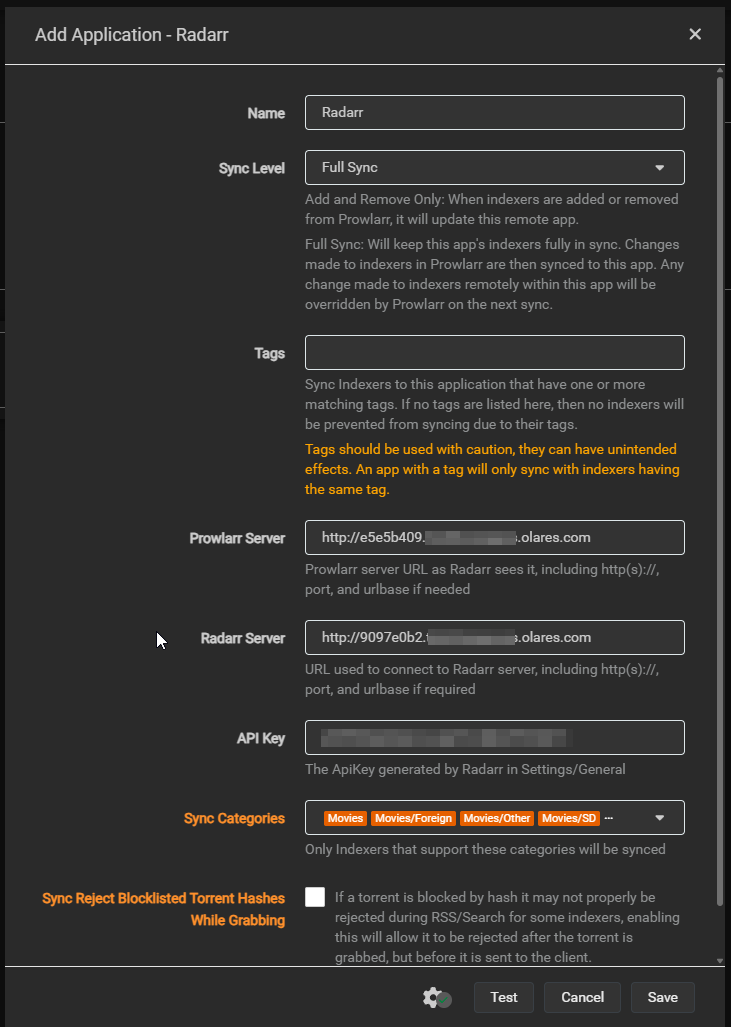
You need to do the above process within Prowlarr for EVERY single media management app you intend to use.
Install Download Clients Within Your Applications
Now we need to add a download client, again in our case this will be qBittorrent. Prowlarr finds the data through an index, qBittorrent retrieves that data through a download.
You will need to add a Download client to EVERY app you plan to use (Radarr, Readarr, Lidarr, etc.).
Now, when adding a download client you need to pay close attention to the following:
- There should NOT be any HTTP on the front of the URL
- Nothing should follow the .com at the end.
- Open Radarr
- Select Settings / Download Clients
- Add qBittorrent for the name
- Enable
- Set the URL of qBittorrent
- Note: This should NOT have any HTTP(s) on the front and NEEDS to end in .com.
- Port 80
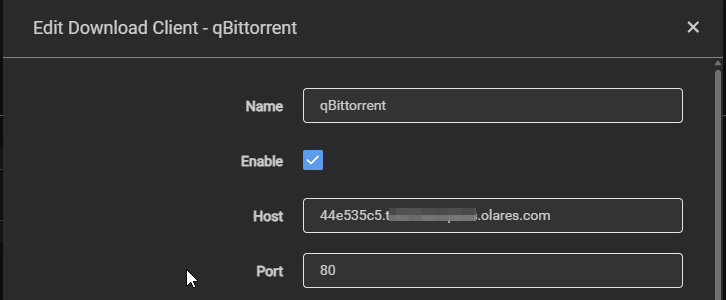
Next, change the other settings:
By default, installing qBittorrent does not have a username and password required, so the below steps/image would not be required if you did not make one during install.
- Add the username and password you created when Installing qBittorrent
- Then click test
- Then click save if it worked, if not check your errors.
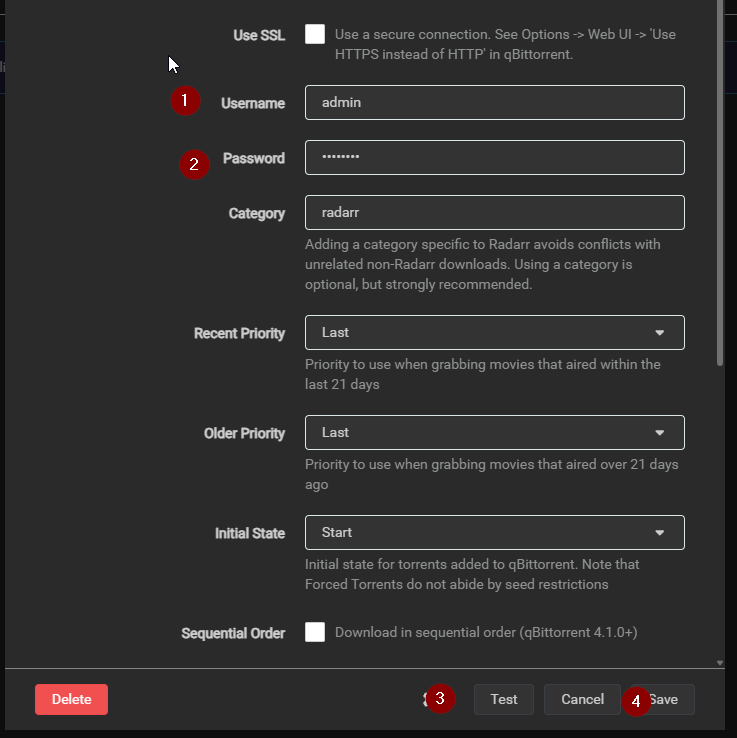
Remote Path Mappings
Because Olares puts applications within containers, they may be unable to see the same paths, so we need to set file download locations that each application has permissions to access.
Within Radarr (or any other *arr app) perform the following:
- Click Settings / Download Clients
- Add a remote path mapping
- Host: (select your qBittorrent application)
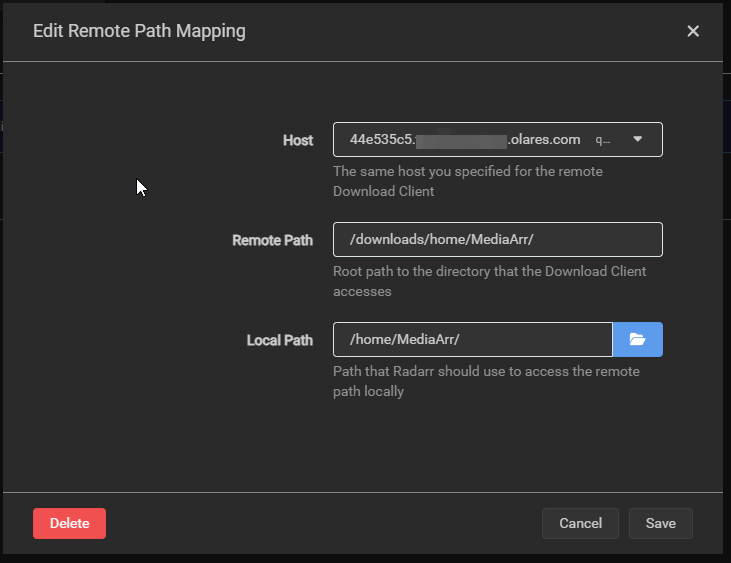
- Remote path will be set to the same as what we set in qBittorrent in our case it will be (/downloads/home/MediaArr) like shown below:
- Local Path: /home/MediaArr/
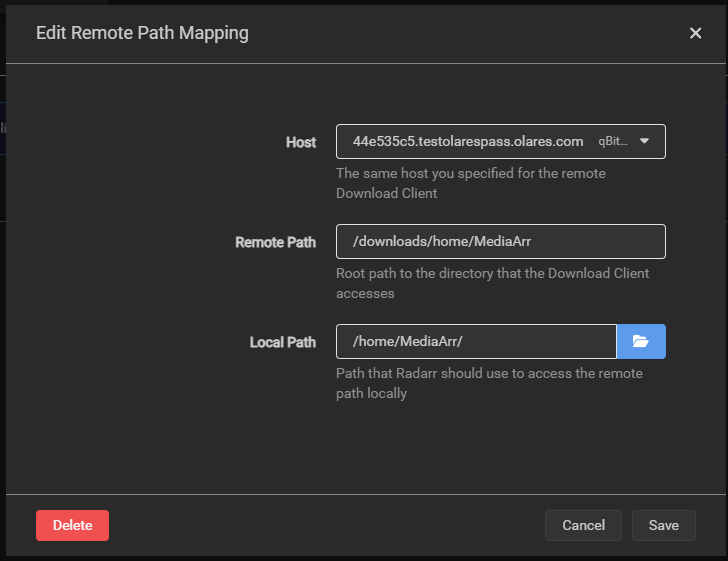
Then click save.
What this does is tell Radarr (or any other arr software) that hey, qBittorrent is downloading the files into a folder it manages (MediaArr) and how it can see the folder is via this directory (/downloads/home/MediaArr) but how I see it based on where I am installed is (/home/MediaArr/).
It then automatically copies that file content to its root folder location that Radarr manages. We set that root path earlier if you recall under Settings / Media Management to (/home/Movies) and that is the file that Jellyfin scans.
Search for Content
There is just one thing left, we need to grab some media! I will show you how to now download media in Radarr!
Within Radarr go to the Movies tab at the top left of the menu, in our case we sill search for Spider-Man
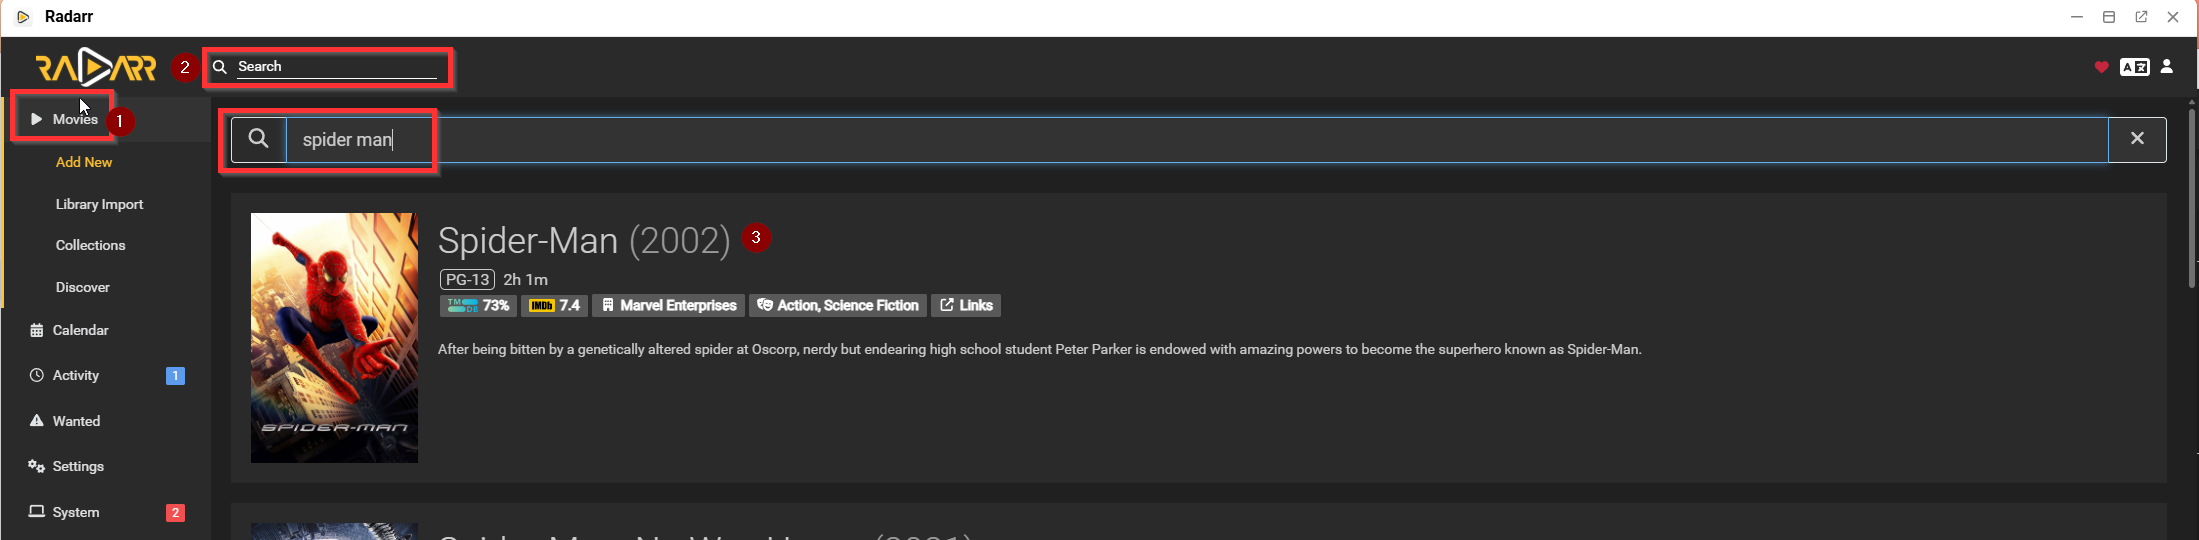
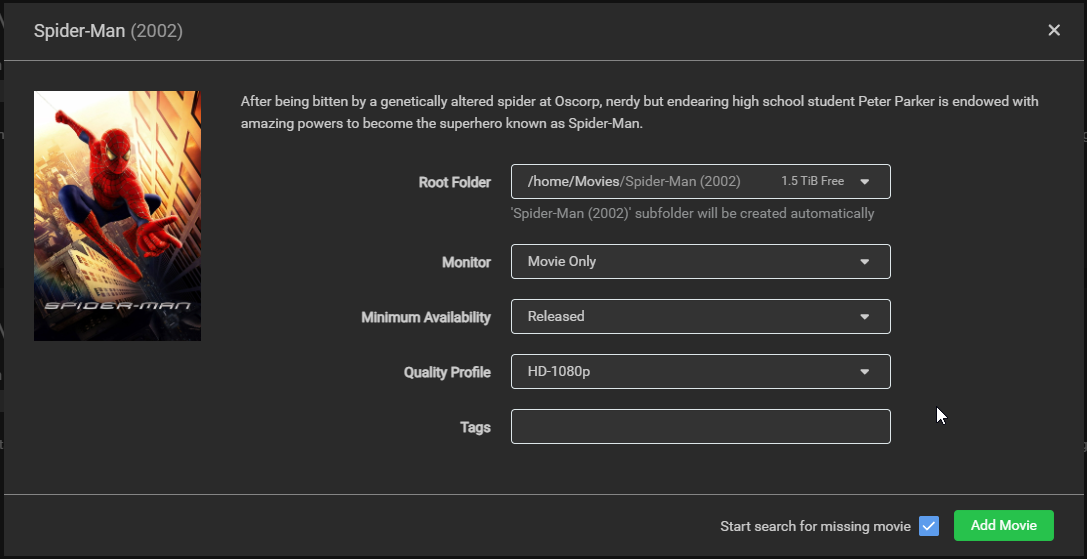
We can then select the movie, in our case we will pick the one shown above. I will also change the download to 1080p (you can download higher resolution but I just do not want the 720p offerings). Then I will click add movie
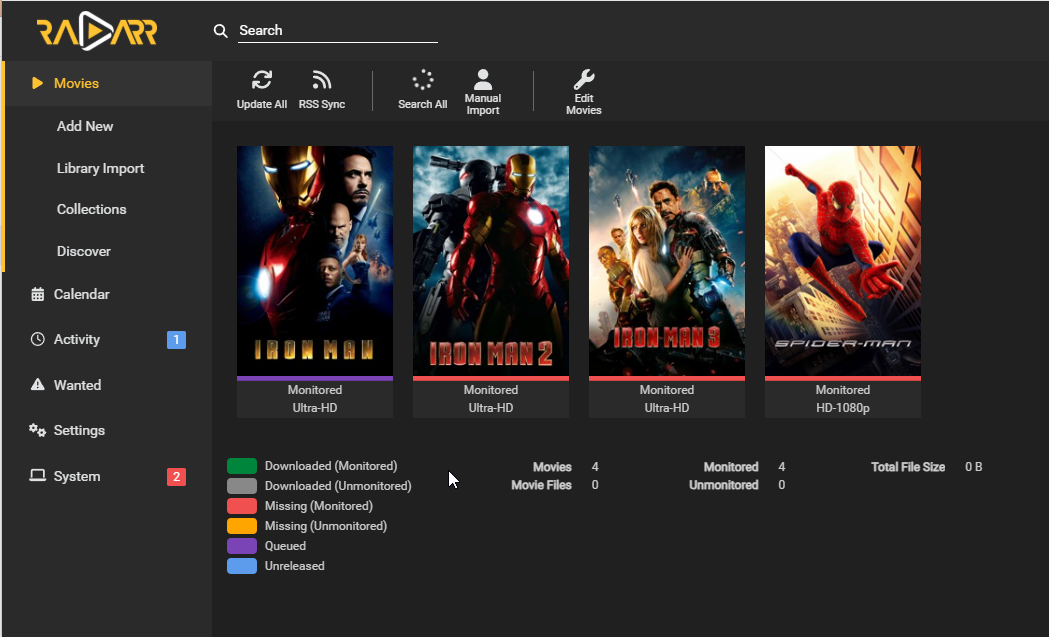
If we click our Movies tab at the top left again, we can now see Spider-man is now showing. Go ahead and click on it:
Next we are going to select Search Movie

In the bottom left you will see a status indicator:
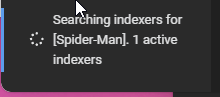
Next we want to click Activity from the left menu. You will be able to see if your movie requested is downloading or not:

You can also go over to your qBittorrent app and ensure it is downloading in there too:

Download JellyFin
You may come to realize, although you downloaded media content, you are unable to paly it in apps like Radarr, that is where Jellyfin comes in. Download Jellyfin from the app store, create an account, and point your JellyFin to the correct folders if need be.
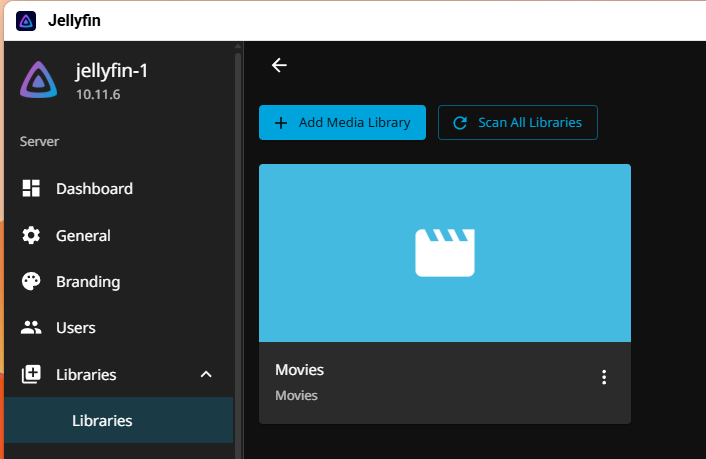
To do that click the hamburger icon at the top left / select dashboard / libraries / libraries. From there you will be able to add media libraries.
Enable Hardware Transcoding
Some streaming devices like FireTv hardware devices will struggle to transcode the stream that JellyFin sends to them, this leads to lots of buffering. Lets take advantage of our 5090 and do all the transcoding on the Olares device.
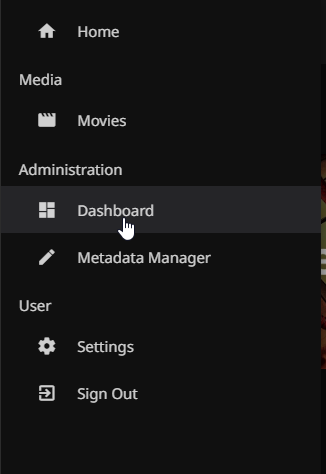
Within JellyFin, select the hamburger icon on the top right / dashboard:
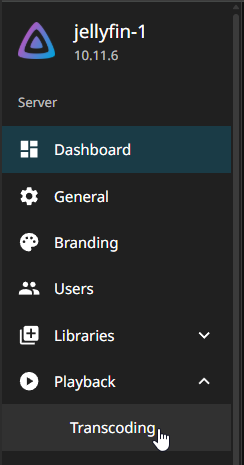
Then select Playback / transcoding:
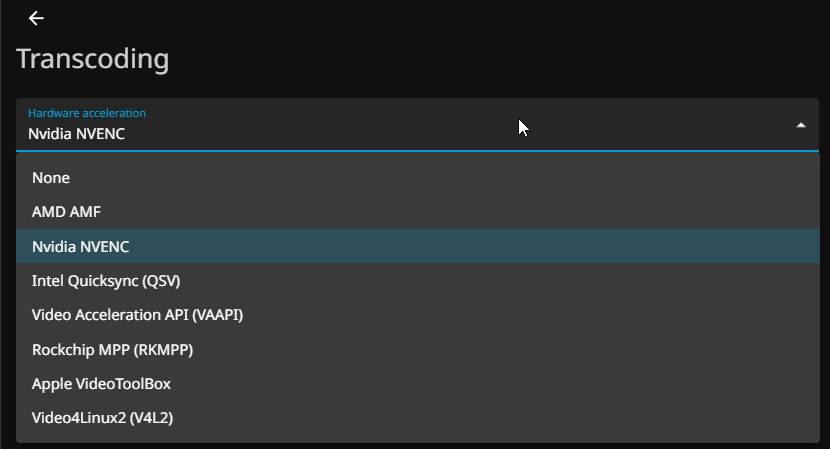
From the dropdown select Nvidia NVENC:
Then scroll all the way to the bottom and click save.
Set Your Buffer on Jellyfin Clients
Okay, one of the last things you need to do is limit your bitrate. If streaming to something like a Fire TV, if the bitrate is higher than the buffer, you will fill the memory of the Fire Stick/cube/TV, causing the CPU to be overwhelmed and not play the video back smoothly. When you set a high bitrate, you are telling Jellyfin to send all the data it can as fast as it can, even if the end client cannot keep up.
The key here is to set it fast enough you do not lose quality of your video stream, but slow enough it does not overwhelm the hardware. I would recommend you start at 40 Mbps per second and see how it does.
To do that, select the gear icon when you are streaming a video:

Next select quality:
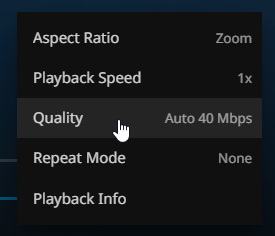
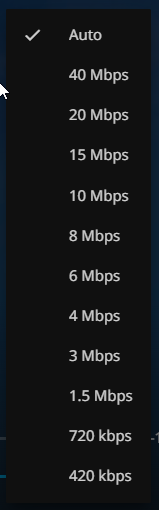
Then depending on the quality of the video you are watching, these speeds will differ. In our example above, we have auto, 40, and 20. My PC can handle auto (sets it as fast as it can and usually is what leads to errors on lower end devices). Mess with these speeds until you get good quality and no buffering:
Watch Your Favorite Movie
That is it, you can now select your favorite movie by selecting the Jellyfin icon on the top left and browsing and movies you have downloaded.
I Still Cannot See My Movies in Jellyfin
If you downloaded a movie and it shows the files in Radarr like:
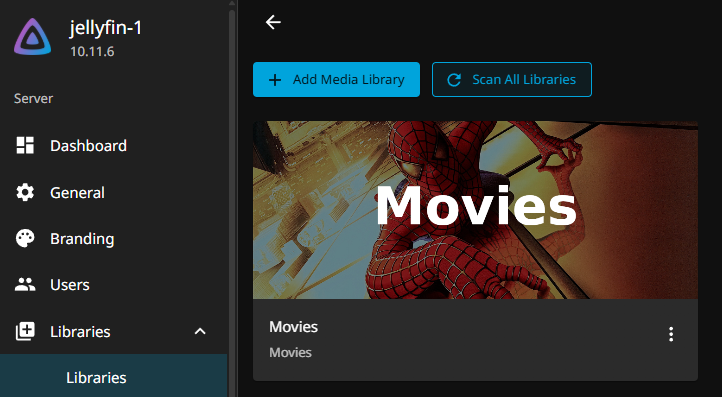
Your Jellyfin only scans for new content every couple minutes. To manually refresh your libraries go to Dashboard / Libraries / Libraries / (scan all libraries)
Turn off QBittorrent Seeding
One thing to consider is seeding, if you download qBittorrent you will be seeding the same data you downloaded. The culture of Torrenting comes with seeding but for some like on a laptop, you would not want to be seeding well at School on a college network. To turn seeding virtually off to protect yourself when on sensitive networks you can open your qBittorrent app, select tools from the top menu, options, then BitTorrent scroll down until you see Seeding Limits turn on When ratio reaches and set it to 0.
Some claim this can block you from the torrent network but I have been unable to verify this claim. Again, use this as a precaution but I know many says it goes against the beliefs of torrenting which also includes seeding for the decentralization of information.
That Is It!
There you have it, now you can start your journey to becoming a “DataHoarder”!
I hope you found this tutorial useful, please reach out to us via the below social links if you have any questions!
This tutorial was for educational purposes only. All tasks show in this tutorial will be done at your own risk. Check your local laws and regulations first.
Potential Errors:
This section covers a common error we see people run into. However, note that instead of the file paths both being set to (/home/MediaArr) you may need to create a separate folder for your movies under /home/Movies/
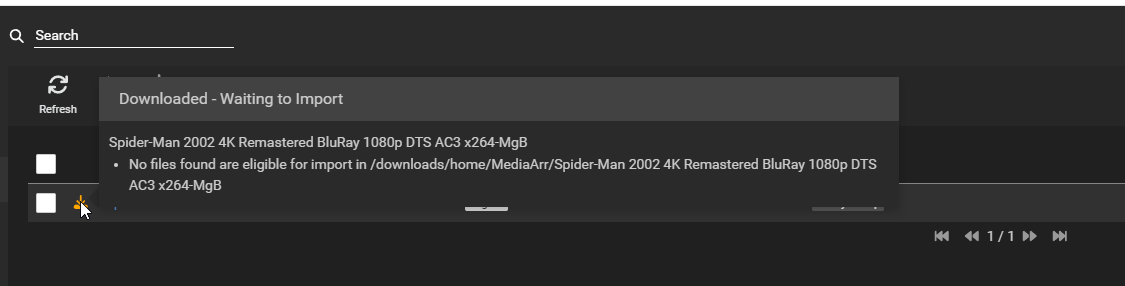
Error: Stuck on “Waiting To Import”
So manny people run into the issue where qBittorrent downloads the file that you searched and requested through one of the apps like Radarr, but after it downloads, althought succesful, it acts like it cannot see the media content like shown below:

If you want to read up on this error on your own, we used the documentation found here
You will need to go to Settings / Download Clients. At the bottom you will see a section called Remote Path Mappings, click the plus icon on the far right.
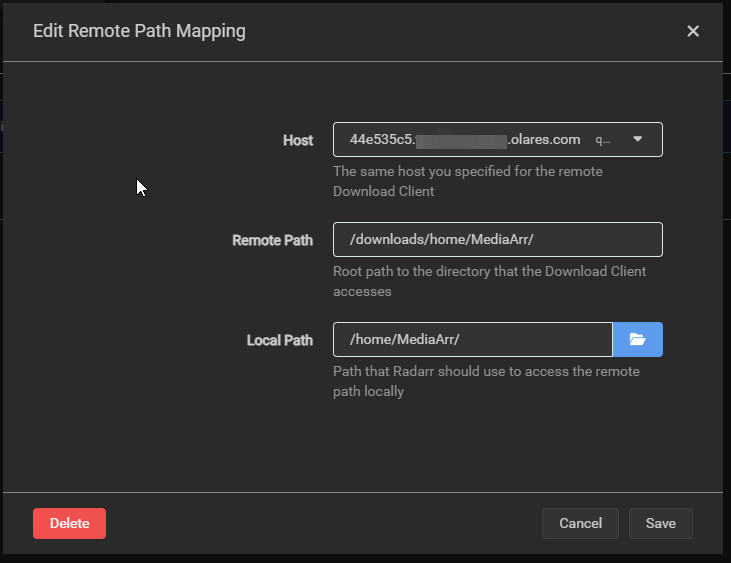
- Host: (Click the drop down menu and you should see your qBittorent URL automatically.
- Remote Path: This will be the path in qBittorrent under tools / options / downloads. Then scroll down to where we set the “default save path” and grab that again.
- Local Path: This will be the file folder you setup earlier within your file explorer.
Going back over to our movies library, we can now see our movie files shown:
